Finally looking at the bottom of the case I stumbled on the removable filter. I wondered where it was because the front could not be taken off, and I found it there. Also in the pictures one can see the rubber feet that absorb vibration, and are very soft. The filter is removed easily by squeezing the tabs on either side of it, and simply pulling it out. I didn't bother to take a picture of it fully removed however.
Something to note is that even though the filter is removable without taking any parts of the case off, it's still on the bottom of the case, so that if one wanted to get to it, they would have to at least put the case on it's side, if not flip it over. I know that it is still more convenient then to remove most filters, but still it is something to think about.
Trapped behind the hard drive trays (seen in earlier pictures) is a brown box containing all of the screws, and specialized pieces for the case. It took me a little bit of time figuring out how to get to them with the other side of the case riveted on and all, and then I realized I could simply remove the trays *smacks forehead*. While the trays are out, I decided to take a picture of those too.
Installation
Installation time. With my rig already outside of a case, installation was made pretty simple for me. However there were a few obstacles. First I removed the back plate from the case because my motherboard does not have a standard ATX back. But I took a few picture of it anyway because it isn't just a normal back plate. It has a piece of metal making it much more thick then the standard ones, and because of this it is significantly heavier. It was nice to have a heavy back plate even though I didn't use it. Standard ones are so flimsy, but this one could be handled less delicately which was nice.

Here was my computer in its usual form. The parts all rested on a Lian-Li PC62 motherboard tray, and I ran it out of the case to get cooler temps. Before I could install the motherboard, I had to move this big gang of cables out of the way. All the power cables, the front FireWire/USB, and sound cables were all neatly wrapped, but still all had to be moved out of the way so I could get the motherboard inside the case. Brining it up again, if the Sonata had a removable motherboard tray, this wouldn't have been nearly as big of a problem.

After they were moved, I installed the supplied motherboard standoffs into the appropriate locations. It had been a while since I had used standoffs, I've been used to using the Addtronics and Lian-Li specialized ones that require no screwing. This is what it looked like after installing the motherboard:
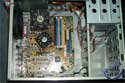
Now to tell you how annoying it was. Since there is no motherboard tray at all for the case, installing screw on the top and the bottom of the motherboard was a pain in the neck. There was only about an inch of space on the top and the bottom in which I had to get my hands into to install things. In this picture you can see the distance between the bottom and side. It's one inch or so from the bottom, and one and a half inches or so from the front of the case, a very tight squeeze. While installing the motherboard I had to use tricks like screwing in the screws with my hand near the tip of the screwdriver to guide it. The screwdriver handle in the mean time was knocking against the side of the case.
Also there isn't much room in this case for larger motherboards. I have a feeling that dual processor motherboards wouldn't quite make it inside. The harddrive rack is a wall that would not allow the installation of one without some annoying modifications.
The next section I worked on was installing the add-on cards; this was also a tedious task. The back plane for installing all the cards has semi-circles between all of them to insure you install all of them in straight and correctly. However my cards aren't perfectly sized so it took a little work to get them in there. Also, the screws were spaced so close together that I would have to remove the screw below the card slot I was installing to, just so that I could get it in. If you don't get what I'm saying, look at how the screw below the FireWire add-on card is ON TOP of the fire FireWire card.

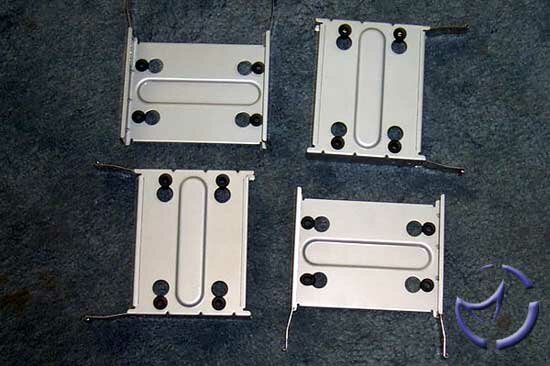
I repeated the task for my Promise TX2 raid card, and the Geforce 4. After the add-on cards were all installed I moved onto installing the harddrives. This was a much easier task to do. All of the harddrive trays have rubber grommets absorbing vibrations from the drives, and all the drive trays require no tools to install or de-install. The screws are specialized so that they cover the entire rubber grommet. I figured that this was to ensure that the screws wouldn't chew into the rubber. The second picture shows the harddrive with one screw off so you can see the full grommet and how the screw covers it entirely.
NEXT