|

Click To Enlarge
A closer look
The packaging is designed with a 'see and want' kind of approach, with clear plastic showing off the contents easily. One thing I would say about the packaging though, it is probably one of the harder parts to get to grips with! Seriously, it took me quite a while to get into it; but the items inside were well protected and easily viewed so not a bad thing. The packaging is deceiving in one area and that's the weight. I could easily see the clip sat across the three lugs on your CPU socket, and the weight of the package made me worry a bit but after holding it my hands I can see that it isn't all that heavy at all.
  
Click To Enlarge
Opening it up (finally) there's quite a lot to look at. Your eyes are instantly drawn to the fan assembly, with its turquoise blades and black aerodynamic grill. It's nice to see a grill that's different from the normal aluminium or stainless steel (if you even get one) that's included with other HSF's. It is made of plastic but if it does the job I certainly won't complain. The grill is designed to help reduce noise and is also (I think) the source of the nickname with it's rather prominent "X" shape.
  
Click To Enlarge
The centre of the fan has a great looking hologram sticker with the Coolermaster logo on it. I guess that mean's it's a genuine Coolermaster Fan : ) Now here comes the interesting part. When the fan is spinning, the hologram and correct lighting project a still image of the Coolermaster Logo rather than just a spinning blur of colours. Ok, no big deal really, but it fascinated me for a few minutes ....... anyway, the fan itself is based on Coolermaster's patented Rifle Bearing, and my previous experience with such a fan was very positive when it came to the noise department but more on that later. Sitting just under the fan, there is a fan shroud, again made from plastic but again, if it keeps costs down and does its intended job then not something I'll complain about. The shroud grips the fan with the use of a simple clipping mechanism, rather than screwing into it. It also attaches to the Heatsink itself in the same manner. The shroud lifts the fan away from the Heatsink a few millimetres's so that the dead area under the centre of the fan is lessened, hopefully allowing more air to reach entire Heatsink.
 
Click To Enlarge
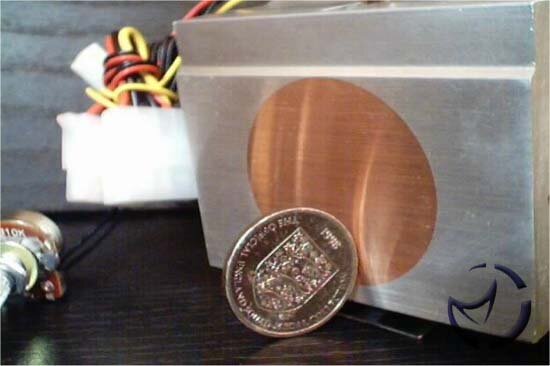
Removing the fan we get a closer look at the Heatsink. The majority of the Heatsink is constructed from Aluminium with a circular Copper insert right where the CPU core and the base of the HSF meet. Copper draws heat away a lot quicker than Aluminium and the Aluminium can disperse the heat a lot faster than the Copper, so hopefully the combination of the 2 will provide good performance.

Click To Enlarge
Moving to the bottom of the HSF, we can see that the base hasn't been machined very well at all. So much for the quality there then. It's not all that bad but it did make me ask myself whether to lap the sink or not and there should be no need for this.

Click To Enlarge
The clip for the X-Dream has been designed with ease of use in mind. It fits over the 3 lugs of the CPU socket and there is a push lever to provide the leverage to get the clip into place. I found this kind of mechanism very easy to use and it felt safer than using a screwdriver. Chances are if you slip you won't do any damage but with a screwdriver you might.

Click To Enlarge
Going back to the fan, you will notice a rather different power cable than usual. The fan draws power from a standard 4 pin Molex connector you will find on any PSU. Coolermaster have also thoughtfully provided a 3 pin, 1 wire speed sensing clip to attach to your motherboard. This is something that I am very pleased to see. I personally prefer to run all my fans direct from the PSU Molex connectors, but I also like to keep the speed sensing (and some motherboards like you to have the speed sensing too). Usually this requires a quick mod but here it is done for you. Talking of speed, it's adjustable.
  
Click To Enlarge
There's a simple "dial" (a potentiometer to be exact) attached to the power cable so you can choose how fast or how quiet you want the fan to be depending on the situation. So if your gaming, turn the fan speed (and noise) up but if your simply just surfing the web, you can turn the fan speed (and noise) down again. Coolermaster include a mounting system for this in the form of a PCI blanking plate with a central hole for the dial to be mounted on. The wire for the dial is about 30cms or 12 inches long so plenty of wire there to reach to the PCI slots. Ideally you would place this in the top or bottom PCI slot of your case making it easy to get at but what if you can't get at the rear of your case? Well first thing that springs to mind is why did you buy this HSF in the first place? But as I said before there is almost 30cm's of wire here so there's no reason you couldn't mount the dial elsewhere such as in the front of your case, using the included PCI blanking plate as a template for drilling a hole. The dial mounts with a simple wash and nut assembly, with the thread for this extending about 8mm, so you could easily mount this on a hole cut into a drive bay cover. A useful addition but one to be aware of before buying
The included Thermal Compound is just your white silicone stuff from Silmore but is better than nothing and something I think all HSF's should come with. Considering the quality of the rest of the package I was quite surprised to see that Coolermaster had skimped in the Thermal compound department, but at least there was some. Despite the 'low cost' materials used in constructing the X-Dream it still manages to give off an air of quality (with the exception of the base). The low cost materials are also light in weight which is another bonus. Let's hope it can perform as well.
Previous Page - Introduction
Next Page - Testing and Final Words
|
 Cooler Master X-Dream HAC-V81 Socket-A: Cooler Master kicks out a new AMD cooler, and although the heatsink is new, it's the included fan that steals the show.