 |
Crossover Mission II Water Cooling Kit: We look into an all-inclusive water cooling kit. It's not quite a turnkey solution, but it comes quite a way in making water cooling more accessible. |
| Date: |
September 24, 2003 |
| Supplied By: |
|
| Written By: |
|
|
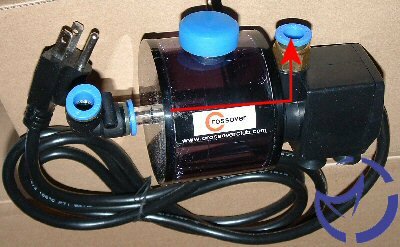
The pump/reservoir isn't all that big, like the rest of the products in the system. However the combination of the pump and reservoir together was a nice idea and removed one extra piece from the equation. The pump has no on/off switch, rather it starts when its plugged in and stops when it doesn't have power. If you have a power system that allows you to turn each power button on separately then I would suggest plugging the pump into this, as it is good to have the water flowing before the system is turned on. The downside of having a smaller, integrated pump is that there is less water flow, from what I calculated, is about 31Gph or 139Lph. This was calculated using water and timing how long it took to get to 250mL, which was about 6.4 seconds. Unfortunately, there were no specs that stated to flow rate of the pump on the products website.
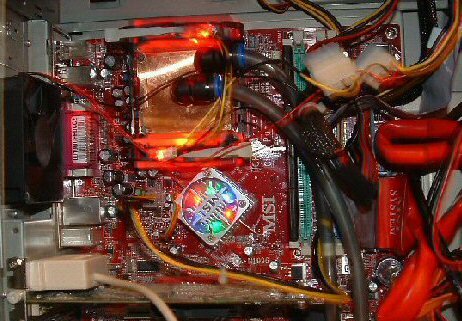
When the system is installed in a Pentium IV system, which uses the extra acrylic pieces, you can install the two LED's that are provided. These are a standard red LED and provide a very nice glow especially throughout the acrylic blocks, as we can see from the two pictures below.
Installation
One of the most time consuming things about a water cooling system is the effort needed to put the system together properly. As a total newbie when it comes to water cooling this is one of the biggest tests of the manual and the system itself, and putting it together gives an indication of how many will fair.
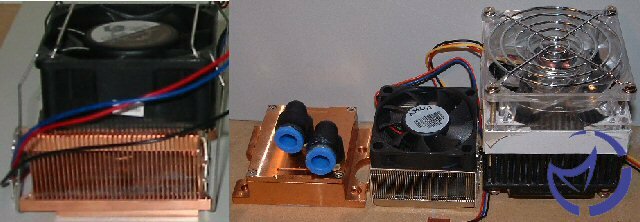
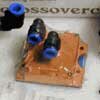
Lying loose in the box was the connecting brackets for both the Athlon and the Pentium IV. It was nice to see that both methods of connecting the water cooling kit to the motherboard were included for the Athlon platform. So those of you who are still have motherboards with the four mounting holes around the motherboard can use this more secure method of connecting the water cooling system to your system. There is also the standard clips for the socket lugs that use all six (three on each side) of these which allows for the water cooling system to be fairly secure even if you have to use this clipping mechanism. The Pentium IV connection is a little more involved and not all the required pieces are included in the box. This is because it uses the bracket from the retail PIV heatsink. There are two acrylic pieces included for this mounting method, and both have two little holes in their sides so that you can stick the two included LED's into them to provide a little bit of color to the system.
Lets now look at putting the system together. The only other things you will need is distilled water, so that there is no buildup of materials inside the tubing, radiator or the water block, and a 80mm fan for the radiator. You can also have other products, in addition to the water, such as water wetter or a UV dye, but I didn't bother in my case. Once you have the materials, you need to figure out where exactly you want the the radiator and the pump to go inside your case. Once that is figured out you have to cut the clear plastic tubing in three pieces, one from the pump to the water block, one from the pump to the radiator and also one from the radiator to the water block.
Personally I cut two longer pieces of tubing to go from the water block to the radiator and from the water block to the pump, as the water block is going to be the farthest away from the other two parts. The pump and radiator I have put side by side basically, so only a short tube is needed here. Also for the radiator there is another piece of tubing that needs to be attached to the radiator so that you can attach the clear tubing to the radiator. This tubing only really needs to be cut in half to connect to both sides of the radiator.
Once you have connected the system together now is the time to actually start the system up. However before you even put it inside your case and on your CPU, I would strongly recommend that you test the system outside your computer. I am very glad that I did follow this advice given to me, as I would have lost most of the computer to water damage. The first test system I received had two leaks, and one of these was on the water block, a very bad place to have any kind of water leak. So testing outside your system allows you to check to see if there is any leaks in the system and hopefully get them repaired. Another thing to look for when the system is on is air bubbles in the tubing which decreases the efficiency of the water cooling system.
After putting the water in and running the system for about a day to make sure that there are no leaks, now it is time to put the system inside your computer. For those of you with full tower cases such as the InWin Q500 this isn't much of a problem as you can easily put the pump and radiator on top of the power supply. For smaller cases it can be more of a cramped fit, but in our other test case, the Cooler Guys Windtunnel IV you can place these at the front-bottom of the case and have the radiator connected to the front intake fan. The pump itself sends the water in the direction as shown below:
| CPU Type: |
Intel Pentium IV-C |
AMD Athlon XP 'Barton' Core |
| CPU Speed/Voltage: |
2.4GHz/1.46v |
3.0GHz/1.53v |
1833MHz/1.63v |
2068MHz/1.775v |
| CPU Wattage (Estimated): |
61.76 |
83.29 |
66.78 |
88.68 |
| Motherboard: |
MSI 865PE Neo2-FISR (865PE) |
Leadtek K7nCR18D-Pro (nForce 2) |
| Memory: |
Corsair XMS3200 C2 256MB
|
| Hard Drives: |
Seagate 40GB ST340016A, 2* Maxtor 80GB 6Y080M0, 40GB Maxtor 40GB 34098H4 |
Maxtor 40GB 6E04L0, Maxtor 40GB 6L040J2 |
| Video Card: |
Matrox Parhelia 128MB (200/250MHz) |
| Operating Systems: |
Windows XP Pro SP1/Direct X 9a |
| Drivers: |
Parhelia 1.04.00.78 |
| Other Cards: |
Turtle Beach Santa Cruz |
Firewire card |
| Cooler(s): |
Stock Intel Cooler; Vantec AeroFlow; Crossover WS5 Mission II |
AMD Stock (2500+); Alpha PAL8045T (TT-Smart Fan 2); Crossover WS5 Mission II |
| Fans: |
Stock Intel, 70mm TMD Fan, 80mm TT Smart Fan II |
Stock AMD 60*10mm fan, 80*25mm 32CFM Crystal Fan, 80mm TT Smart Fan II |
| Case: |
Cooler Guys Windtunnel IV |
InWin Q500 |
| Power Supply: |
RaidMax 400Watts |
Enermax EG365P-VE 350Watts |
| Software: |
Motherboard Monitor 5 |
MBM Log |
| |
SiSoft Sandra 2003 Standard Burn-In Test |
The systems were run for 1000 seconds with SiSoft Sandra burn-in test at normal settings, with MBM 5 and MBM Log running in the background. Apart from these programs nothing else was running. After that the system was allowed to have a CPU usage of very close to 0% for another 1000 seconds. The results were then saved in MBM Log to create a second by second graph of the test. The Thermaltake Smart Fan II was run at medium speed, approximately 3400RPM for all the tests.
|