When it comes to the best in air cooling few manufactures come to mind. is one of these few, with innovative products always pushing the bar. Dreaming up amazing designs for all of their products is just something they seem to be able to achieve. The introduction of the hybrid copper and aluminum heat sink with the Helicoid pins is one such example. Nothing on the market could compare to this design. Swiftech took awesome looks with award winning performance and made a product that really works.
Enter the as a totally redesigned heat sink. With the same basic design as MCX462+ in terms of cooling technology this heat sink should easily perform the same as its predecessor. Swiftech did not stop at just remodeling the image of it and trying to sell the same package again. They went right back to the drawing board to make it better. Switching the mounting mechanism to utilize the socket as well as changing the shape of the product to really expand the motherboard compatibility. Interested yet? I know I am.
Packaging
I am not going to take very long on this section just because the box was so plain. The box the heatsink came in was a plain brown box with two white labels. One displaying some features of the heatsink, the other a drawing of it. Here are two pictures in case seeing the box is going to make you want to purchase it.
Features
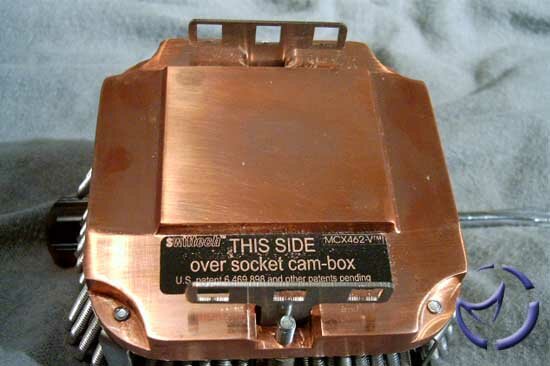
Heat Sink Base
The MCX462-V has a massive ½" thick copper base; and does it ever have the weight to prove it. The heat sink is definitely the heaviest I have ever had. The base is lapped to 0.0003" (3/10 of 1/1000") and polished to near-mirror finish. The base does look really nice; although not totally smooth (you can still see some small scratches) the base should provide excellent cooling without lapping the base any further. I especially enjoyed the warning sticker on the bottom guiding those certain computer users (we all know the kind) that will put a heat sink on backwards. There is no chance of error with this heat sink.

|

|
Heat Sink Top
Not forgetting the top, Swiftech has implemented the Helicoid pins once again. The placement of the pins has changed however; the pins are now in a circular pattern, with all of them bent on angle to provide even more air turbulence. The pin placement and angles are designed to optimize cooling and reduce noise at air flow levels as low as 22CFM and 23dbA.
Retention Mechanism
The retention mechanism I was at first confused by, but after using it I was amazed at the simplicity of it. Gone are the days of fighting the retention clip on AMD heat sinks, wondering if you are going to crack your processor's core. The MCX462-V utilizes the socket as its mounting surface, leaving the four motherboard holes behind. This has some pros and cons. It makes it a lot easier to install the heat sink; no longer making you remove the motherboard to install the heat sink, but it loses the extra support of the motherboard. This heat sink has some weight to it, so I would not move my case too far with it installed. The retention mechanism is extremely, and I mean extremely, easy to use. All that you have to do is simply push the heat sink down over the socket, and then unscrew the two Philips head screws. Pressure is then applied evenly through the processor. This method also removes the possibility of cracking your core because you can not tighten the heat sink too tight. The springs are what supply the tension, not you, so you cannot mess that up. Within seconds the heat sink was installed and ready to go.

|

|
Fan support
Swiftech was also thinking about enthusiasts in this area. Providing support for both 80mm and 92mm fans this heat sink aims to please. You can really hook up any fan you would like to this heat sink. Care to go the silent route, install a silent 92mm fan, still providing better air flow than the almost standard 70mm fan, with silent operation. Push the silence out of the way and install the Vantec Tornado 80mm fan, who needs their ears anyways when you can get awesome cooling. Installation of fans is really the only problem I had with this heat sink. The included snap rivets were in my eyes way to hard to put in. I found installing the fan to be finicky, and the most time consuming process of the whole install. Switching from an 80mm to a 92mm however is just a matter of switching four brackets and then snap in your new fan.
NEXT