When it comes to air cooling, there are a few companies to keep in mind while shopping for a heatsink. is one company that I always consider when I need a cooler. Other than being excellent performers, their heatsinks and waterblocks are of extremely high quality. This quality doesn't come cheap, but like the old saying goes, you get what you pay for.

The Swiftech MCX-V series of heatsinks have fared quite well in our labs. We've already looked at the Intel Socket 478 version, as well as the AMD Socket A version and today we'll be looking at the MCX6400-V for AMD's Socket 754 and 940.
Specifications
| Fan |
AMD 64bit Opteron K8 (Socket 754 & 940). |
| Dimension |
Overall dimensions without fan 3.3" x 3.91" x 1.63" |
| Material |
Aluminum pins and Copper base.
CNC machined, C110 copper base, 3"W x 3"L x .500"H, flatness better than 0.0003", micro surface finish 8 or better.
405 Helicoid Pins made of High Thermal Conductivity Aluminum Alloy, press fitted in the base.
|
| Weight |
Weight: 26.4 oz (750g) without fan. |
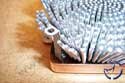
The Swiftech MCX6400-V Heatsink
Although the specifications resemble past Swiftech coolers, once it's out of the box, many of the changes are quite obvious. Inside the box are the parts needed for installation, a blister pack of thermal paste, installation instructions, and the heatsink itself. As with their previous heatsinks, the MCX6400-V is composed of aluminum pins and a thick copper base. There are helicoid pins fitted into the base, which addresses the heat dissipation weakness of copper. As we've mentioned in the past, copper absorbs more heat than aluminum (great for that initial blast of heat when powering on a PC with an overclocked CPU), whereas aluminum dissipates it better. The heat moves from the copper to the aluminum, where it is cooled by a fan of your choosing.
This new helicoid pin design increases surface area for heat dissipation. According to Swiftech's specifications, the pins increase air turbulence for more efficient heat dissipation compared to traditional fin design. Of all the "V" series of heatsinks, the MCX6400-V weighs in at the heaviest (over 26 oz) and has the highest number of helicoid pins (405). The fins are "flared", which is designed to optimize cooling as well as reduce noise by using lower speed fans. Compared to past MCX coolers with high speed fans, the theory is you'll get similar performance with a slower fan as a result from the angled pins.
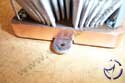
The MCX478-V accepts both 80mm and 92mm fans. Larger fans typically move more air at lower speeds than 60mm or 70mm fans. Lower speeds means less noise of course, but you're obviously free to use the biggest (80mm or 92mm) and loudest fan you can find. Fans are instaled using snap-in rivets, making fan installation a breeze.

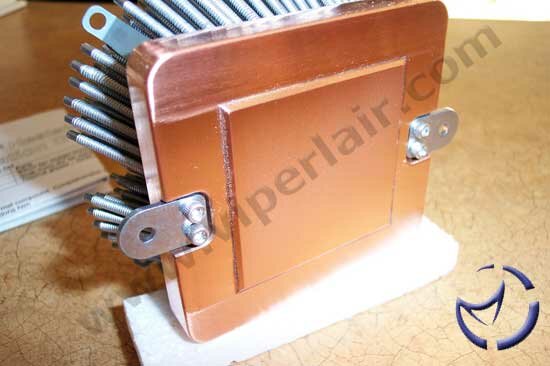
The copper base measures 1/2" thick. There's a heat spreader to rest on top of the Athlon 64, and it's large enough that it will make complete contact with the CPU. The heat spreader has been machined flattened to 0.0003", and although it isn't a mirror shine, the base is well polished. The surrounding area seems a little rougher, though this isn't a concern though as this area never makes contact with the CPU.
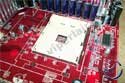
Before we get into the installation process, the above image illustrates the heatsink's connection to the motherboard. As we can see, screws will be required to bolt the heatsink into place, unlike the MCX478-V for the P4 which uses clips.
Installation
If you already have an existing Athlon 64 motherboard installed, you probably do not need to remove it for heatsink installation. This will depend on the height of your motherboard and motherboard tray spacers as if it is higher than the AMD heatsink retention backplate, the backplate will end up dropping. I should point out that Swiftech does not include this backplate, but most motherboard manufacturers should.
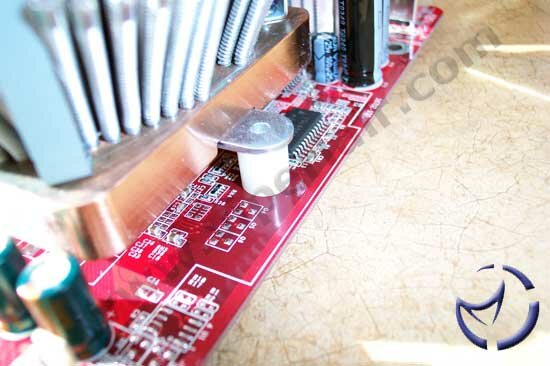
The first step would be to remove the AMD heatsink retention bracket as pictured above. Since we had a spare motherboard handy that did not have this pre-installed, we simply put the backplate in place.
There are two nylon spaces that need to be placed on top of the nuts that protrude from the backplate. After you drop those in, install your CPU, apply thermal paste, and then put the heatsink on top. Line up the heatsink connection to the spacers before moving on to the next step.
NEXT