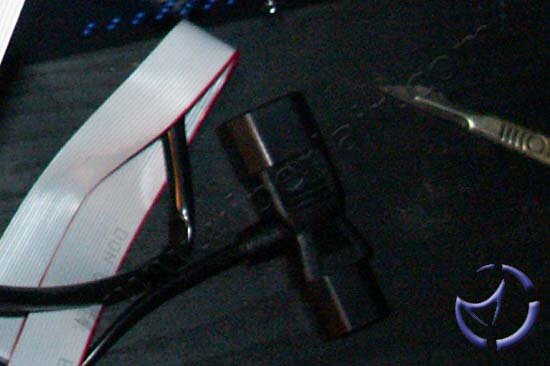
The asetek Vapochill Lightspeed, unlike its earlier brethren, is powered not from a PSU but by means of your wall outlet. To reduce the cabling asetek have used a hermaphrodite pass-thru plug which you plug into your PSU and then plug your normal PSU lead into this allowing you to get power for both your PC and the Vapochill from the one lead.
Plugging in the Lightspeed to the power for the first time will bring the LCD display on the unit to life and all being well you will also have a blue LED on the ChillControl. When you press the power button on your case you are presented with 3 options. Holding the power button for 1 second gives you option 1, which is to power on your system. Option 2 (hold case power button for 2 seconds) will turn off the backlight on the LCD and Option 3 (power button for 3 seconds) will dictate the level of power to send to the motherboard. I have to say that these options do flash by quite quickly and I've not seen anything in the otherwise great documentation supplied, so I did accidentally turn off the LCD and sit there wondering why the system wasn't powering up. Just once mind you … honest! I have to give props here to option 3; One of the motherboards I have used with the Vapochill Lightspeed wouldn't power up 8 in 10 times I tried it, until I used option 3 to alter the motherboard power from Low to High.
Ok, so holding power for a second and letting go begins the startup procedure. The compressor will kick in and the LCD will start counting down the temperatures from the probe mounted near the evaporator head. Since the start up temperature for the PC is at -10°C by default, you will have to wait about 45 seconds before the PC is powered up. All being well, the system will power on. While you're waiting for your OS to boot you can always amuse yourself by watching the rapidly falling temperatures on the LCD display. The bottom line on the display will show the evaporator temperature and the top will 'ticker tape' scroll the message 'Waiting for USB Link'. Should you power down the system for any reason, as long as you power up while the unit is still cold, the ChillControl will check the temperature is at or below the dictated startup and power the system almost immediately.
Once in Windows, you can download the software and driver from the asetek site for the ChillControl, and while this was a non-issue for me and I would bet most, I would have liked to have seen asetek supply a CD with the driver and software on it. CD's are pocket change in this day and age and while the software will undoubtedly be upgraded and isn't essential to the day to day running of the Vapochill Lightspeed, it might serve you if for any reason you need to reinstall without access to a net connection.
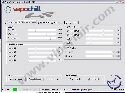
The ChillControl software consists of a tray minimizable, 5 tabbed application. When minimized, you will get the temperature of the evaporator in the system tray as an icon and you can even right click it to load up your saved configurations. The 5 tabs from left to right are:
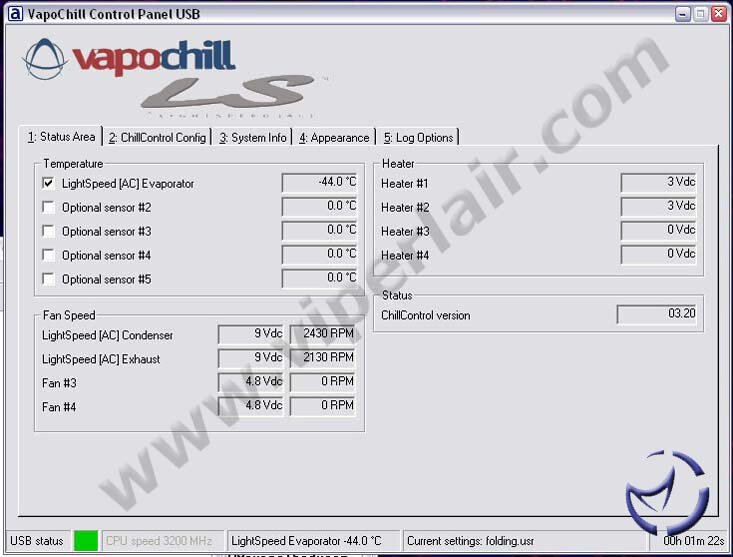
1. Status Area – here you can choose which temperatures out of the 5 are being monitored. The first entry will be taken by the Vapochill Lightspeed itself but if you are using optional temperature probes you can enable them here, as well as see the current fan speeds, heater element voltages and ChillControl Version.
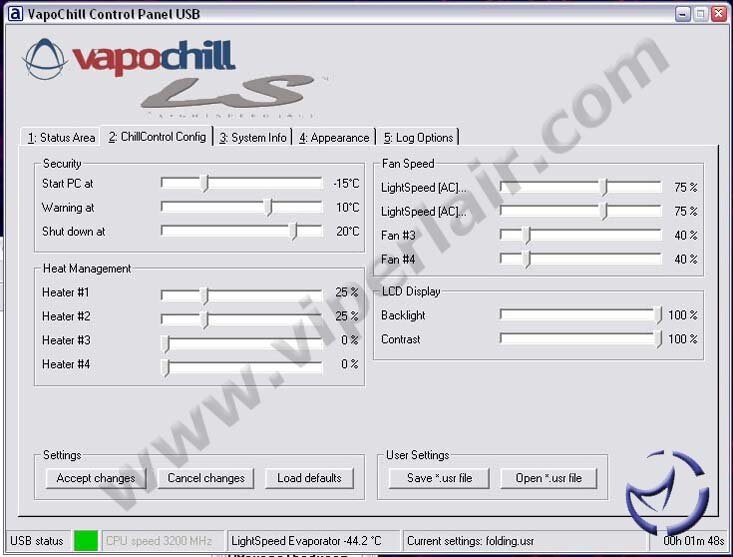
2. ChillControl Config – This is the tab that allows you to control the settings. You can set alarm, shutdown and start temperatures here, as well as fan speeds for up to 4 fans (the first 2 being the Vapochill Panaflo fans), control the heating element voltages and dictate the backlight and contrast of the LCD. All of the settings can reset to defaults with one click and you can even save your own custom configurations.
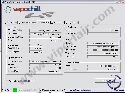
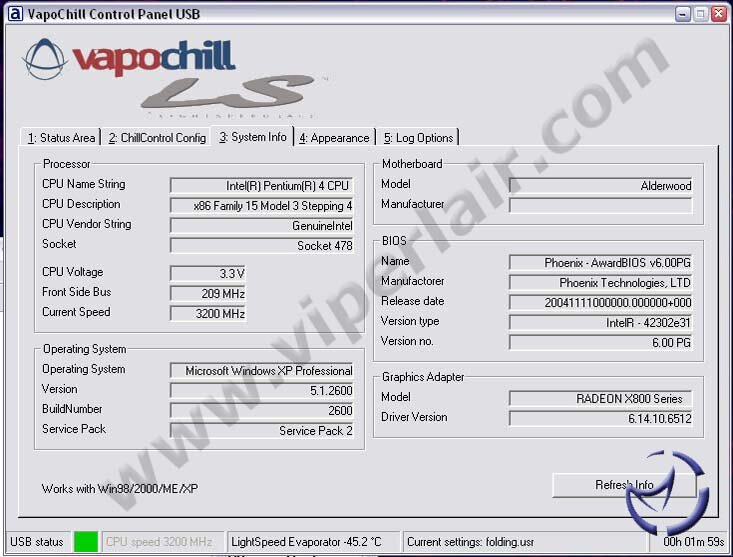
3. System Info – As the name suggests, this tab will give you a run down of your system.
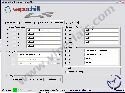
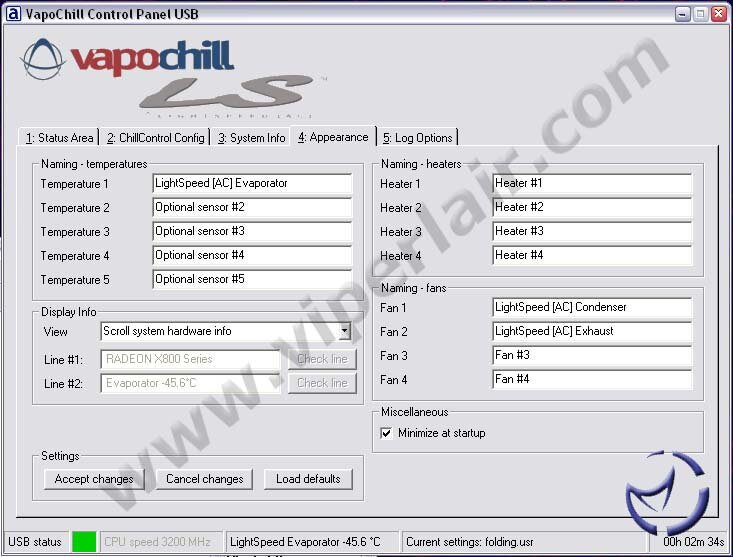
4. Appearance – This tab allows you to change the various names of the components you display with the LCD, as well as letting you set what the LCD will display, be it temperatures or even a ticker tape scrolling list of your system specifications.
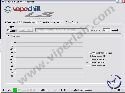
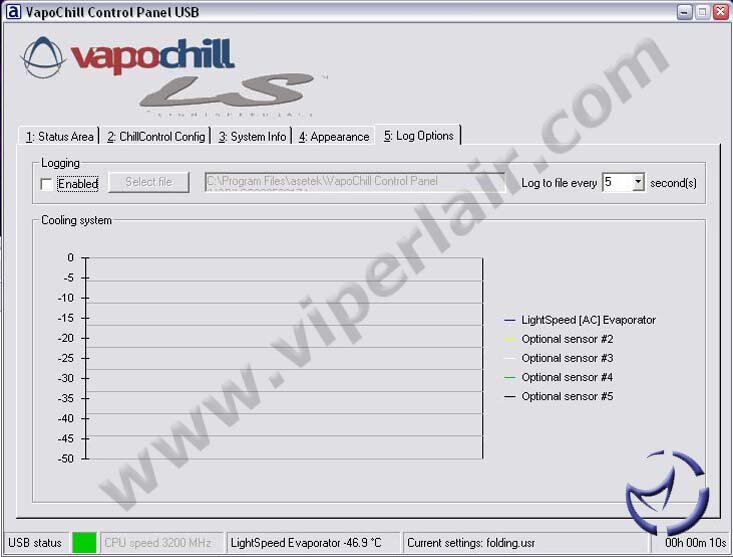
5. Log Options – here you can enable logging.

Testing
Before we get into the major testing of overclocking the CPU and running a few tests, I thought it might be interesting to quickly show the extra efficiency of a CPU at stock speeds using a Vapochill, in comparison with an everyday heatsink. Now obviously when it comes to cooling performance between a heatsink and the Vapochill there won't be any comparison, however comparing a P4 540 at stock settings under both cooling solutions should hopefully show something. I'm using TMPGEnc and our standard VL test clip, converting an Animatrix file, titled The Second Renaissance Part 1, and a WAV created from VirtualDub. The movie was then converted it into a DVD compliant MPEG-2 file with a bitrate of 5000. Tests were run 3 times and the average calculated. Times are in minutes, seconds, and lower is better.
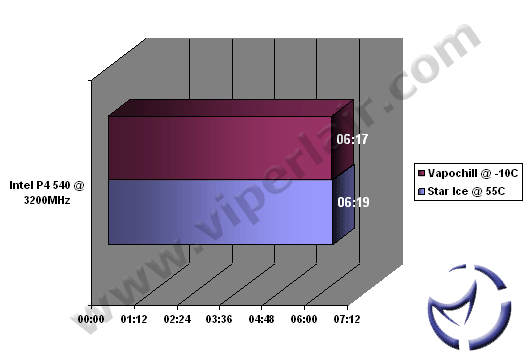
Bottom line is that a CPU will perform with greater efficiency at lower temperatures, which this test shows in a practical manner. Only the cooling solution was changed here, no extra voltage, no memory tweaks or anything, just plain and simple temperatures. It isn't a big drop, but of course this gap will widen if you convert a longer clip.


![asetek VapoChill LightSpeed [AC]](/images/reviews/cooling/misc/asetek/vpls/thumb.jpg)