The RocketRAID 1542 Card


The card comes in the yellow and blue box that Highpoint have chosen for there SATA device range, which should appeal more to the consumer than the professional black and green of previous ATA packaging. Inside the box we find the contents safely packaged in between 2 foam sheets. Included with the 1542 we find 2 blue SATA cables, the manual and 3 floppy disks (what, no CD ?). Ok let's take a tour of the card itself.
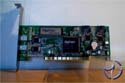


The view from the top shows a card that is quite busy but very low profile, with lots of small resistors and capacitors bunched in between the various chips and headers. To the top right of the card we find the 2 internal SATA headers, a good location placing the headers towards the front of your interior case. Below these we find the first of the Marvell serializer-deserializer chips (more on these in a bit).


At the bottom right we have a buzzer, which is used much like the POST as found on motherboards. In the middle of the card we find the brains, the HPT374 controller chip, which some of you may recognize, since this is the same chip as found in ATA 4 channel solutions. But isn't this a SATA card? This is where the Marvell chips come into play. The PCI bus handles the data and passes it onto the HPT374, which in turn passes the data to the Marvell chips to be converted for the SATA headers. So we will be limited by the HPT374 to ATA133 speeds, but as this is a 33MHz PCI card, we would be limited by the PCI bus anyway.


To the left of the HPT374 on the top edge of the card is the BIOS which is capable of being updated to support new functions, indeed you can currently download support for RAID 5 as you read this. On the left we find 2 more Marvell chips supporting the 2 external e.SATA ports which are found on the PCI Plate, allowing access from the rear of your case. The ports themselves are very small indeed, reminiscent of a miniature version of a firewire port.
Installation
Like any PCI card, installation is simply a case of powering down, plugging in the card, and turning you machine on. At this point your motherboard will post followed by the post for the 1542. Like the 1520, the 1542 will add 24 seconds onto your boot process which is quite a considerable amount, in some cases doubling the time it takes to boot up. After this if you have any other controllers (such as an onboard RAID controller) they will initialize as well.
As the 1542 is initializing and scanning for devices, it is at this point you can press ctrl-h to enter the setup screens for the card. These screens are very much like a motherboard BIOS but a lot simpler. If you already have a Windows OS installed you can ignore this and set everything up from the comfort of your desktop, thanks to the Highpoint RAID Management Software included.
The RocketMATE 1100 Enclosure
The RocketMATE 1100 is quite a versatile device really. It's compatible with both RAID (users' can safely hot-swap a failed hard disk drive with a fresh hard disk, then recover and rebuild the damaged RAID array - all without powering down the computer, or interrupting the computer's operations) and non-RAID configurations, supports Hot Swap, is external and therefore also mobile. It takes a single ATA drive and does the PATA to SATA conversion allowing it to be used via an external e.SATA port.


In the box for the RocketMATE 1100 we find the RocketMATE itself, a power adaptor, the e.SATA cable and a manual. The RocketMATE 1100 is constructed from aluminium with plastic at either end. On top of the device we find a big SATA logo advertising the devices interface.


At one end of the device we find nothing but a solitary LED off to one side, but at the other end we find more to talk about. It's here that we find the I/O part of the device. Starting from the left and going past the Logo's we have the ON/OFF switch. Next to this is the input for the 12v DC adaptor and finally a port that looks a lot like a Firewire port, the e.SATA port.
Installation
Installing the RocketMATE only takes a few minutes and is very easy to do. At the end of the device where we find the ON/OFF Switch we also find 2 screws at the outer edges. These screws hold the interior and exterior together.


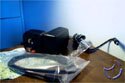
Once these are removed we can then easily slide out the tray and get access to the inside. On the otherside of the wall so to speak, where the I/O ports for the exterior are to be found, we see the 4 pin Molex connector and a standard 40 pin IDE header. Installing a drive is a piece of cake, simply plug the Molex connector in and then slide the drive onto the header.


At the bottom of this try we find 4 screw holes to attach the drive to it (screws supplied) and after this it's just a matter of sliding the exterior cover back on and screwing the 2 exterior screws back into place. A bit of power and a connection to the 1542's exterior e.SATA port and we are ready to go. I was hoping that it would be a case of plug it in and Windows would add the device as a removable device but this isn't the case. After a reboot the 1542 picked up the 1100 and Windows added it to the rest of the storage space/hard drives listed. Any usage of the device is indicated by the LED at the other end, glowing green for power and orange for disk access. At this point it was exactly the same as using a normal hard disk. Turning the 1100 off confused the hell out of Windows (I was able to browse it's files via cache) but the 1542 card began to make its warning beep/siren noise, mailing me to tell me there was a problem with one of my disks, and shutting down access to that drive. It's a shame that Windows needed a reboot to see the 1100 (and to realise it was gone) but it certainly works. Lets see how well shall we?
NEXT


