Cooling Installation Tips
Installing an Athlon based CPU cooler has gotten easier over the past 18 months, but there are a couple things to be aware of:
1) They can still crack if you tilt the heatsink during installation.
2) Thermal paste (compound) is a must.
We've covered plenty of cooling products here, so I invite you to check those reviews out for some of our favorites.
Thermal paste is to be applied in a thin, even layer on top of the CPU core. This is a case of where "less is better". It's not a peanut butter sandwich, as more compound will hurt cooling performance.

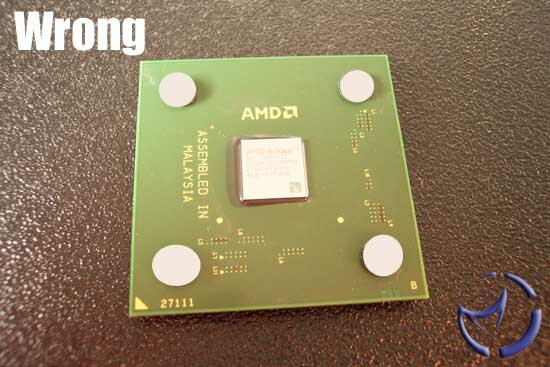
Usually, a small drop of a compound of your choosing will be enough. I usually wrap my finger in Saran-Wrap to keep the paste free of any contaminants. Spread it around to cover the entire core, then gently run an edge of a credit/business card to remove excess paste. This is the right way to do it. The wrong way is as the images below:
Please excuse the obviously Photoshoped images, but I'm trying to illustrate a point. Do not put paste on the heatsink support pads, and do not put paste everywhere, minus the core.
The best way of installing the common heatsink (normally clip based) is to insert the CPU into the socket, then place the heatsink on top of it.

Before doing that though, make sure you remove the protective sticker, if there is one. This sticker usually protects a thermal pad, which tends to suck, so feel free to discard that as well (especially if you're applied thermal paste to the CPU... do not use both).

Going back on topic, connect the clip to the first set of prongs. These prongs for the retention clip are opposite of the keyed (raised) area of the socket. Whatever you do, do not push down or tilt the heatsink while attaching it. This is how cores crack folks. It is alright to hold the heatsink steady with one hand, so long as you don't apply force downwards.

On the side where the keyed area is, this is where you'll need to push down to connect the retention clip to the prongs. Some clips don't require tools, whereas others require a flathead screwdriver.
Considering that you'll be overclocking, it's a good idea to spend a bit to get a quality heatsink and fan. Swiftech, Thermalright and Vantec are my personal favorites for air cooling, but more extreme methods are water cooling and phase change solutions. They are much more complicated to setup, and a lot more expensive, not to mention risky if you're not careful, but if you're going to be pushing the envelope, it's time to take the kid gloves off.
Test Setup
ABIT NF7-S nForce2: Barton 2500+, 2 x 256MB Corsair TWINX PC3200 Ram, MSI FX5200, 120GB Western Digital SE 8MB Cache, Windows XP SP1, nForce 2 Unified Driver Package 2.03, ATi Catalyst 3.6.
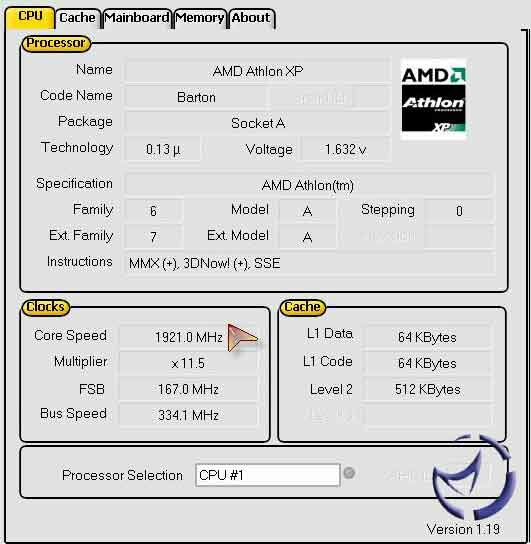
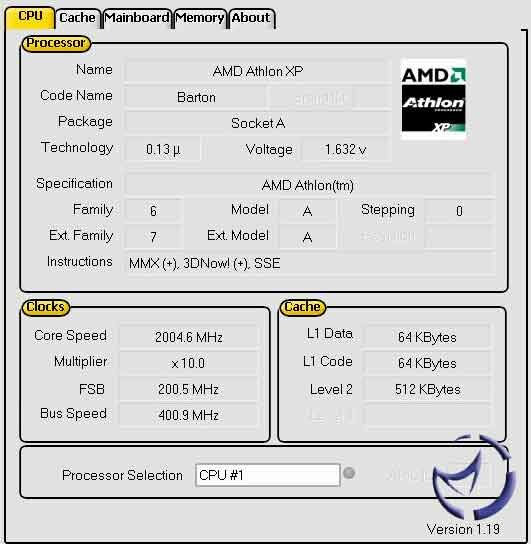
Before wrapping things up, we're going to have a good ole proof of concept demo. Is a higher FSB more important than a higher multiplier? We're not going for any crazy overclocks here (but you can read our latest CPU and motherboard reviews for those), and sticking within the 2GHz range, give or take a couple MHz.
NEXT