The Vapochill Lightspeed [AC] was packed in this white box adorned with the Vapochill logo and strapped to a half pallet for transit. Inside the unit was safeguarded with polystyrene blocks to hold everything in place, as this is quite a weighty item; I doubt you'll see many LAN goers with one.

asetek supplied me with the Lightspeed unit with a change of clothes. Usually you buy the asetek Vapochill Lightspeed with either a silver or black 'Lian Li' alike surround, however asetek do manufacture and sell dress up kits to alter the colour. I decided to take a look at the Deep Sea Blue and boy am I glad I did. The finish is excellent and really does make a nice difference from the usual silver and black enclosures. Only downside is I just have to get my case side and top panels done the same now.

The front of the Vapochill Lightspeed features in the top half a blue backlit, white character LCD which will display pertinent information such as temperatures, system specifications and generally let you know what is going on. Underneath is a printed Vapochill logo. Beneath this is the front grill which provides access to fresh air for cooling the condenser.
The side panels have a sloping sequence of drilled holes to provide more venting. The rear, unlike the front and sides is unfinished silver, and since this is only the rear and likely won't be seen, is a non-issue. It's nice to see that asetek have not used some restrictive pressed out grill but a proper stainless steel grill for the rear 120mm Panaflo fan. Just to note, the front fan on the condenser also uses a 120mm Panaflo fan. Ordinarily you shouldn't open these units as there is the chance of electric shock, as well as the fact this will invalidate your warranty. However, we of course had to get a look inside.
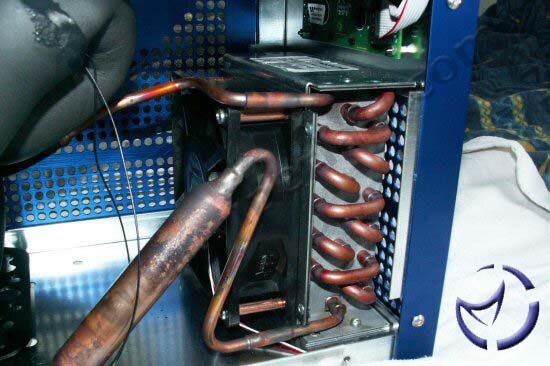
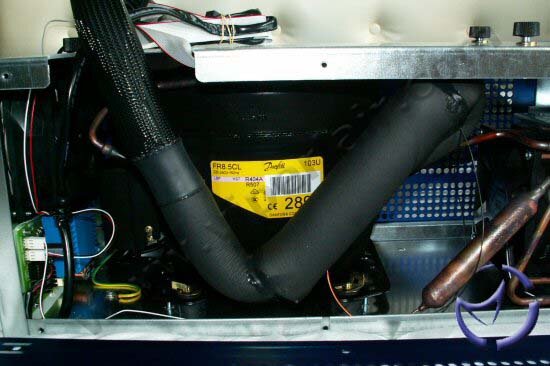
At the front we can see the 120mm Panaflo fan backed onto the condenser. Above this is the rear of the front LCD. Towards the rear is the Danfoss compressor charged with R507 and behind is the exhaust fan. You can also clearly see the insulated pipe that leads up to the evaporator head itself.
The top of the Vapochill Lightspeed, like the rear is unfinished silver, and like the rear (even more so in fact), since you will be putting a case on top, it won't be seen. The four large thumbscrews you can see serve to attach the base of your case to the Vapochill Lightspeed.
Installation

Since we need to attach this to the bottom of our case, you need to do some drilling and cutting to which asetek supply this handy template sheet. The overall size and look is designed to match the Lian Li PC60 series and the like, but I'm going to be marrying this up with my Antec P160 which it just so happens is only a few millimeters short, and not something you notice until right up close.
So I stripped the case of components, laid it on its side and whipped out the jigsaw … which promptly died on me after a few seconds. Breaking out the hacksaws was the only other option (if anyone finds my rotary tool I'll be eternally grateful) and of course I had no spare blades. Again after a few seconds the blade broke reducing its length and my stroke to half. About an hour and a lot of cursing later (since someone has also walked off with my metal file too …) I was left with this rather ugly and dangerous looking hole. I then had to enlarge this to compensate for the lack of a file, making it bigger than the Vapochill unit's hole. Why didn't I go to the shops and buy a new file and some blades? Because Murphy's Law states that since on the day I started this all the shops shut half day in the afternoon … Anyway, after hacking out the hole and drilling the four holes required, I had the case ready for mounting and luckily I had some Akasa Pax Mate left over from another case. This was used to line the bottom of the case and cover up my DIY nightmare.

Since the test platform is a Socket T based Alderwood, asetek also supplied their new Socket T installation kit. Unlike the previous CPU kit which was pretty universal, you will need a separate kit for use with the Socket T format.

As you can guess, installation is not a straight forward exercise, however it really isn't all that difficult either. It's certainly not as easy as installing a standard HSF but I have seen some interesting mounting options on those and watercooling kits of late. In comparison, the Vapochill Lightspeed isn't all that different. asetek supply you with a manual for the Vapochill Lightspeed [AC] unit as well as one for the Socket kit itself.
The first thing you need to do is prepare the backplate which entails sticking a neoprene pad to the metal plate and putting four plastic rings into the guide holes. Once this is done you stick on the first of the heating element pads. These heating elements are used to dry up any condensation that might form.
Once this is done, you apply a washer to each of these solid guide pegs and screw them into the back panel through the motherboard mounting holes. You can then turn your attention to the CPU socket. Inside the socket you find 775 pins arranged around a middle square which needs to also be insulated. In the Socket T Installation kit you find a little square foam piece which sits in the socket and the CPU goes on top. Now I know some of you are going to shout 'what about dielectric grease for the socket?' Well if you've never seen the pins inside these sockets before, they are really tiny, look like stubble. Obviously they are very fragile so not a good idea to go messing around with them. Also the way the CPU is enclosed in the socket should effectively reduce the chances of 'pin rot'. Like the rear, neoprene is placed around the socket area in two layers leaving you with the need to just apply some thermal compound to the top of the CPU (asetek even supply a 'pipecleaner' for this purpose, along with their own Thermal Paste).
Moving on to the evaporator and its 'Clamshell' head, we first need to install the second of the heating elements. Pull back the insulation from the piping to expose the evaporator, wrap the heating element around the white inserts and push it all back together leaving the head proud by about 2mm.
After this you simply push the completed clamshell over the metal guides on the motherboard, cover the four guides with the springs supplied and tighten them with the supplied thumbscrews. Job done. No mess and while it will take you a while and the clamshell can be a little 'where is my third hand', it isn't a difficult install, pretty easy in fact.
The last thing you will need to install is the USB ChillControl PCB. I would have liked to have seen this in some sort of box but it's smaller than a hard drive and the supplied mounting pads should mean you can find somewhere in your case for it. The ChillControl in conjunction with the Windows software will let you control heating element voltages, fan speeds, alarm, shutdown and PC power up temperatures, as well as providing options for monitoring temperatures and controlling fans separate from the Vapochill functions. Quite a handy unit, the ChillControl will interface with the Vapochill Lightspeed and its LCD display, and then your motherboard (via an internal USB header on your motherboard) and any other fans or temperature probes you have attached. The ChillControl also sits between your case power button and the motherboard, so that the Vapochill Lightspeed can turn the system on when temperatures have reached -10C (by default) at the evaporator.
NEXT


![asetek VapoChill LightSpeed [AC]](/images/reviews/cooling/misc/asetek/vpls/thumb.jpg)